You are here: Marketier > Marketier Administrative Tasks > Managing Workflows

Managing Marketier Workflows

This section contains step-by-step instructions on how to manage workflows for your Marketier email campaigns. The workflows for Marketier work just like they do for iAPPS Content Manager, if you are already familiar with that process.

In managing workflows, you perform the following tasks:

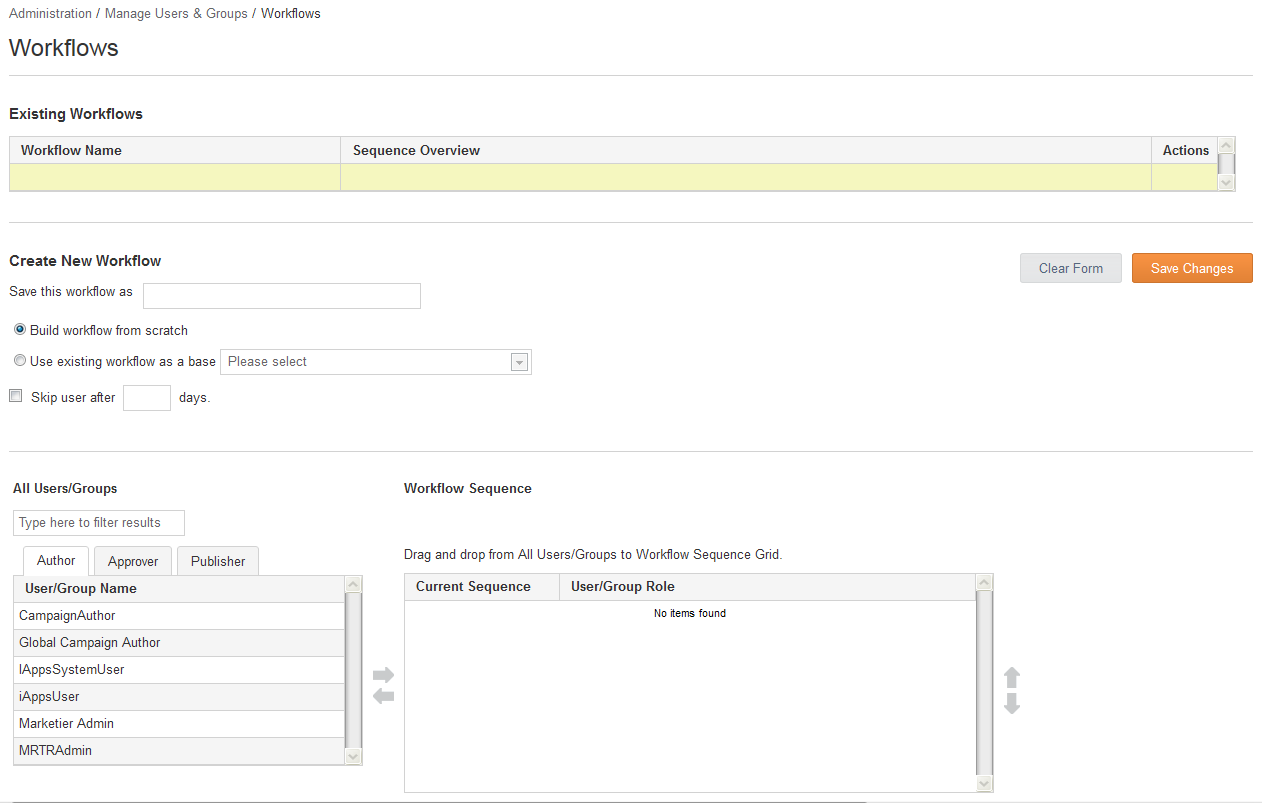
To begin, select Administration > Workflows.

The Workflows screen appears:

Workflows displays the following information:

Manage Workflow Pane

Displays

Existing Workflows

Names of the existing workflows

Sequence of each workflow,
which specifies: the users who must act; and the sequence by which those users must act to complete this workflow.

Create New Workflow

Options for how to build a new workflow, from:

  • Scratch
  • An existing workflow

All Users/Groups

Tabs for various workflow roles listing users assigned to those roles.

Workflow Sequence


Area where you map users to steps in a workflow sequence.

Creating a New Workflow

You can create a new workflow from:

To create a new workflow:

  1. In Workflows (Administration > Workflows), right-click the name of any existing workflow or in an empty space in the in the list at the top and select Create New Workflow.or simply start entering information in the Create New Workflow Area.
  2. Give the Workflow a Name.
  3. Select a Radio button to either:
  4. Next you will build the workflow sequence
    1. in the All Users/Groups Area, pick the Author tab.
    2. To add a user to the sequence, click on a user/group name in the list and click rag or click the right-facing arrow to add the user to the workflow sequence.
    3. Repeat for the Approver and Publisher steps by clicking on those tabs and adding additional users.
    4. If you make a mistake or change your mind about a user, you can highlight their name in the Sequence area and click the left-facing arrow to remove them.
    5. Re-order user sequence, if necessary. Click on a user\group name in the workflow sequence and, if necessary, to move a user/group up or down in the workflow sequence, highlight the user/group name and then click the up and down arrows.
  5. Optionally, to specify that the workflow is not held up by one user, you can click the “Skip user after” check box and enter the number of days in the “days” field.
  6. When you are finished with the workflow, click Save Changes.


iAPPS is a product of Bridgeline Digital

Copyright 2014 Bridgeline Digital. All rights reserved.

Technical Support

1-800-430-3539
https://support.iapps.com

Bridgeline Digital

Headquarters
80 Blanchard Road
Burlington, MA 02180

http://www.bridgeline.com