Open topic with navigation
Managing Attributes
Attributes allow you to have flexible categories of items that can be filled in with attributes from your database in order to personalize your email campaigns and iAPPS Pages.
Attributes for iAPPS Marketier are focused on contact properties, while in Content Manager they focus on pages and menus and in Commerce, products.
You will need to be a Marketier Admin to have permissions to add or edit Contact Attributes within Marketier.
There are a number of types of attributes, such as text, numbers or URLs.
- Multiple Attributes
- Attribute Groups
- Adding/Editing Attributes
- Attribute Categories
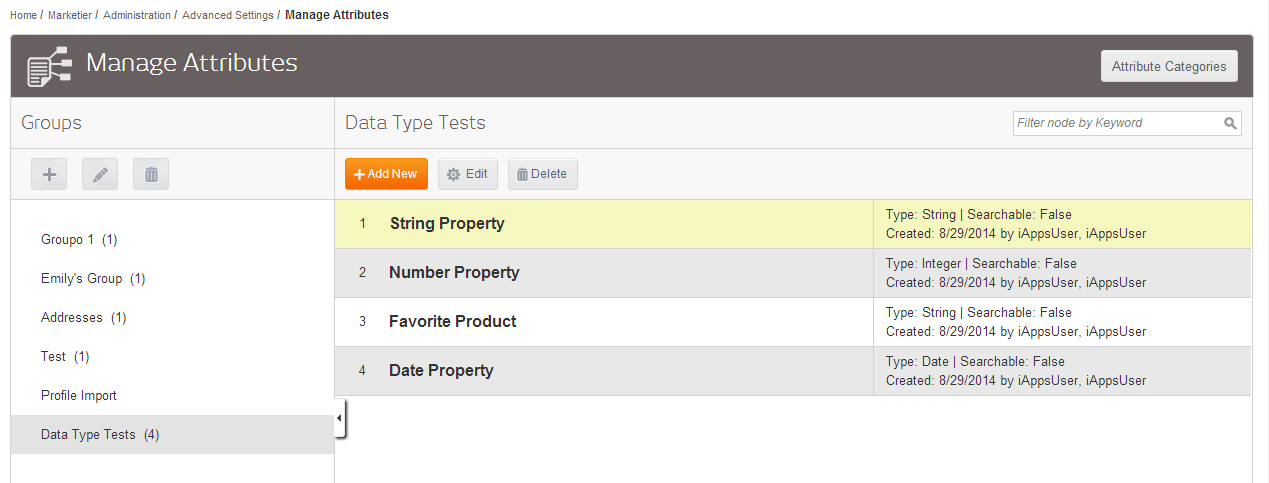
To manage attributes for Marketier, go to .
The Manage Attributes screen lists Attribute Groups on the left and related Attributes on the right.
Working with Attribute Groups
Attribute Groups help you categorize your attributes.
When you highlight a group name in the left pane in the Manage Attributes screen, any associated attributes for that group will appear in the list in the right pane.
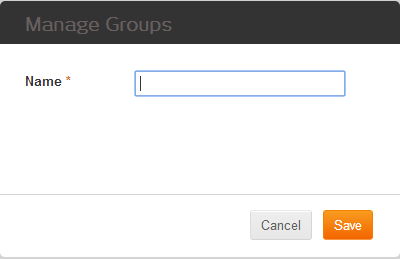
 Adding an Attribute Group
To change the name of an Attribute Group:
- On the left side of the Manage Attributes screen (), click the Add (Plus) icon.
- Type in the new name you want for the Attribute group in the name field in the popup, and click Save.
Changing an Attribute Group Name
To change the name of an Attribute Group:
- On the left side of the Manage Attributes screen (), highlight the Attribute Group you wish to change, and click the Edit (Pencil) icon.
- Type in the new name you want for the Attribute group in the name field in the popup, and click Save.
Deleting an Attribute Group
To delete an Attribute Group:
- On the left side of the Manage Attributes screen (), highlight the Attribute Group you wish to delete, and click the Delete (trash can) icon.
When you delete an Attribute Group, it will also delete all attributes in the group.
- You will receive a confirmation popup, asking if you are sure you want to delete. Click OK or Cancel as needed.
Creating and Managing Attributes
Once you've add ed the Attribute groups you need, you can add and manage the Attributes themselves. First you will create the attributes and then add them to categories to allow them to function in other parts of iAPPS.
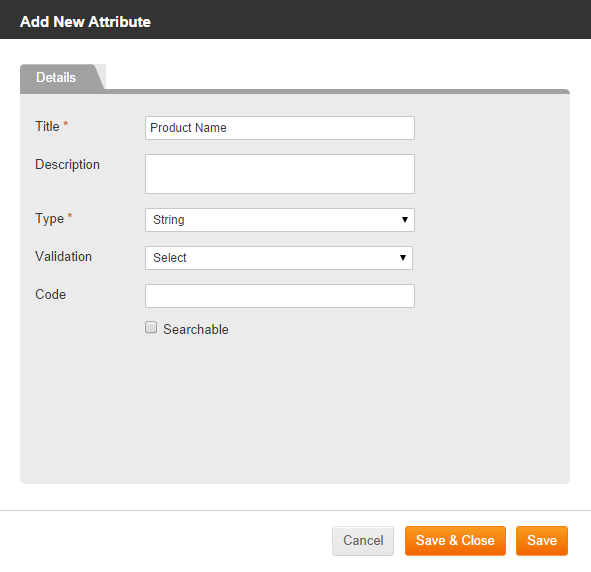
Adding / Editing Attribute Details
- In the Manage Attributes screen, navigate to the Attribute Group (folder) where you want to put the new attribute.
- Select Add New.
- The Add New Attibute popup will appear.
- Add a Title (name) and Description for your new Attribute. To aid other users, you should pick a title that is descriptive and fairly short. For most attributes this should be easy, such as Zip Code, Home Phone, or Last Name.
- Pick a Type of Attribute. Depending on the type of attribute, you will either be prompted to add minimum and maximum values or to add values on the Values tab. See below for more details on the using the Values tab. Attribute Type options include:
- String (of type and numbers)
- Use Values Tab to add properties and options and allow users to select Multiple Values.
- Integer (whole numbers)
- Minimum Value
- Maximum Value
- Decimal
- Minimum Value
- Maximum Value
- Boolean
- Use Values Tab to add properties and options and allow users to select Multiple Values.
- Date
- Minimum Value (Earliest Date)
- Maximum Value (Latest Date)
- HTML
- Use Values Tab to add properties and options and allow users to select Multiple Values.
- File Upload
- Use Values Tab to add properties and options and allow users to select Multiple Values.
- Page Library
- Use Values Tab to add properties and options and allow users to select Multiple Values.
- Content Library
- Use Values Tab to add properties and options and allow users to select Multiple Values.
- Asset Library File
- Use Values Tab to add properties and options and allow users to select Multiple Values.
- Image Library
- Use Values Tab to add properties and options and allow users to select Multiple Values.
- You can have iAPPS validate user entries on some types of options. Current validation options include:
- US/Canadian Phone numbers
- URL
- Email Address
- US Zip Code
- US Social Security Number
- The Code field will used by developers to connect iAPPS Attributes to export or import their information to third-party programs.
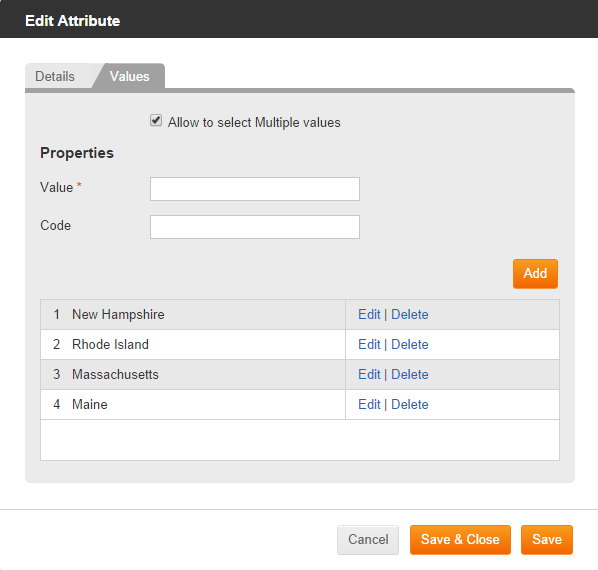
Using the Attribute Values Tab
- To add Values to your Attribute, click Save. If Attribute Type is string, boolean or a library option, a new Values tab will appear. Click on the tab and add your information to the relevant fields.
- If you want users to be able to define multiple values than check the box.
- In the Value (required) field, type in the sting value that you would like and click Add.
- Your value will appear in the list below.
- Repeat these steps until you have added all the values you need.
-
- Click Save to return to the Details tab or Save and Close to return to the main Manage Attributes screen
Once you have created your basic Attributes, you will need to tie them to other parts of iAPPS database using Attribute Categories.
Attribute Categories
Attribute Categories do blah balh ba
Once you have added the attribute, it will be available to use as a Merge Field in an email, or as an option in a Contact Form, etc.
Adding Attribute Categories
Using Attributes in Marketier
You will see which attributes were created in which product by looking at the prefix:
- Contact: Marketier
- Site: Content Manager
- Product: Commerce
Inserting a Contact Attribute into an email.
While you are editing an email, you can use the contact attributes you created in
Using Attributes elsewhere in Content Manager.
You can also use iAPPS Attributes in forms and other parts of iAPPS.
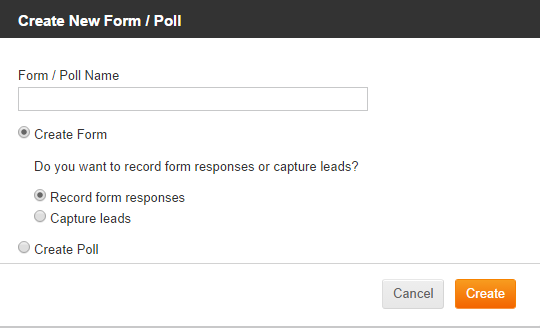
When you create a form in iAPPS Content Manager, you can use it to capture leads for Marketier. If you choose Lead Generation, when you crate the form, your Marketier Contact Attributes will appear by default in the Form Lead Capture interface. For full details, see:
Managing Attribute Categories in Content Manager