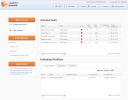
This section gives an overview of the iAPPS Marketier Control Center, which appears when you login to iAPPS Marketier.
You can access the iAPPS Marketier Control Center at any time by clicking the Dashboard Link on the top menu.
The Control Center is your portal to working with email campaigns. It provides a Main Navigation menu and sections called containers, which combine commonly used features and functions. The Control Center also includes a Search function.
The main navigation menu bars appear at the top of the Control Center. The options available to you within each of the navigation menus will depend on your user role. The more permissions or roles that you have, the more options you will see. See "Marketier User Roles and Permissions"for details on user roles within iAPPS.
The Top Menu is divided onto two lines. The top line has more product-wide information, such as links to other modules and user profiles. The second line has menu information for the specific product you are using.
Modules The iAPPS menu provides quick access to other products in iAPPS Product Suite to which you have a license. To switch to another product, you can either click the top link to go to the Control Center/Dashboard for each product or choose a particular admin function to go there directly.
The Site Editor link at the top right brings you to the Site Editor view, which allows you to edit your content in WYSIWYG mode. You can go directly to your home page or to the last page you visited.
Next to the Site Editor link are notifications that list what site you are currently managing as well as your login name and profile information.
Switching Sites: The site you are currently managing will display at the top of the screen. If your implementation of iAPPS has additional sites or sub-sites, such as language variations, the sites will be listed here. You can change which site you are editing simply by clicking on the appropriate option from the menu. If you do not have permissions for other sites, no menu will appear.
Name/profile: The pulldown menu next to your user name allows you to change your password and change your profile information. Users with administrative permissions may see additional entries here to check for iAPPS updates or reset the cache for the website.
Sign Out If you need to log out of iAPPS, simply click on the Sign Out link at the top right of the screen.
The Dashboard link will bring you back to the Control Center/Dashboard.
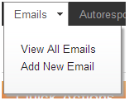
The Emails menu links to existing emails or you can choose to create a new email.
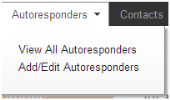
The AutoResponders menu allows you to view existing responses or you can choose to create a new ones. Response are emails that are automatically sent out in response to customer/website users actions such as making a purchase or downloading a white paper.
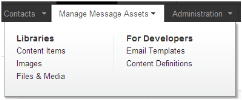
The Manage Message Assets menu allows you to access your iAPPS content libraries, including content, images, and files. If you have permissions, it also gives access to Developer tools such as the Libraries for content definitions, and email templates.
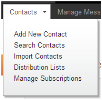
The Contacts Menu accesses the contacts and distribution lists . Here you can add, edit or import contacts and manage your lists. If you have permissions you will also see Manage Subscriptions, which allows manual override of the subscribe and unsubscribe functions.
If you have permission, you will also see the Administration menu.TheAdministration menu allows administrators to manage interna users and groups of users as well as Email Workflows, Links, Developer Configurations, and Salesforce settings.
Search The Search and Find and Replace options have been more closely tied together for iAPPS 5.0. Click on Search to bring up the Search menu. You can conduct a quick search of iAPPS by entering as search term in the box and clicking the Search icon. Alternatively, you can see Find and Replace options by clicking that link. See "Search and Search Filters" for more detail.
Page Help The top left corner of the screen will also show you help options available for that page. Clicking the Page Help link will bring you to a video or help page.
Breadcrumbs Each Page in the Admin Interface except your Dashboard shows you a breadcrumb trail of where you are within the iAPPS library and Admin. If part of the breadcrumb is in blue, it is a clickable link that will allow you to quickly navigate within that section. You can also always use the main mega-drop-down menus to switch to another Admin page.
The iAPPS Marketier Control Center includes the following containers, which combine common features and functions:
Note: The specific contents of your Control Center will depend on your user role. User roles are explained in the User Roles and Permissions section.
The Quick Actions box allows you to quickly jump to common actions such as Adding a contact or Creating a New Email.
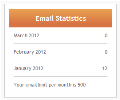
The Email statistics container displays the aggregate number of all emails sent out each month and the number of emails allowed by your license.
The Sender Score area provides a link to a third-party website, Return Path, which provides a sender score for the email address from which you send Marketier emails.
This sender score provides information about how emails from your source address are likely to be evaluated by email receivers and thus how trustworthy your source address is viewed. The information that Return Path provides can aid in improving your email delivery rates.
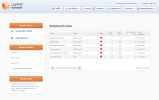
The Watched Events container provides information about events being tracked in email campaigns. They are based on Watched Events defined in iAPPS Analyzer.
The Watched Events container appears only if you have licensed iAPPS iAPPS Analyzer as part of your iAPPS Marketier deployment.
The Watched Events container provides the following information about the status of email Watched Events:
Watched Events Column |
|
---|---|
Watch |
Triggered event by which iAPPS Marketier measures Watched Events for this email. |
|
Name of email to which Watched Event applies. |
Status |
Color coded status displaying how many conversions the email has achieved in relation to conversion goal. For map of color codes, see the “See "Assessing Emails"” section of this document. |
Actual Qty |
Number of conversions that occurred for the Watched Event. |
Target Qty |
Number of conversions targeted for this Watched Event. |
Est Completion Qty |
Projection of the number of conversions at end of email campaign based on current number of actual conversions. |
Target Completion |
Currently scheduled email end date. |
From the Watched Events container, you can right click to select:
If you have multiple Marketier users involved in sending emails, you can create a workflow to establish a sequence of steps associated with the development and use of an email. A Marketier workflow can include steps for reviewing and publishing an email campaign.
Workflows allow you to assign specific user roles to perform each of the steps in the workflow. In addition, they provide a method for you to track the status of emails throughout their lifecycles.
Note: You will only see information in this container for emails on which you are a Campaign Publisher or Approver.
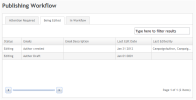
The Publishing Workflow container has the following tabs from which users manage pages in the workflow:
Tab |
Status |
Displays |
---|---|---|
Attention Required
|
Pending Approval |
Emails that are in workflow but have not yet been published. |
Rejected |
Emails that are in workflow but have been rejected by an approver and will not run. |
|
Being Edited |
Editing |
Emails that have been created but have not been submitted into the Workflow or scheduled to run. |
In Workflow |
Approved |
Emails that are in the Workflow. If approved, Emails that are scheduled to run. |
From all the tabs in the Publishing Workflow container, you can right click on an email to select:
Each Publishing Workflow tab displays the following information about an email:
Publishing Workflow Column |
Displays |
---|---|
Status |
Information about the current state of the email campaign. Status designations vary based on the Publishing Workflow tab. See the following table for a description of the possible status designations for each tab. |
Email Title |
Name of email. |
Email Description |
Description of email specified when adding or editing email. |
Last Edit Date |
Last date on which email was edited. |
Last Edited By |
Name of last user who edited email. |